Technical blog
Transporting Configuration in SAP BTP Event Mesh Add-On

created by DALL-E

Vlado Balko
Jun 20, 2024
Integration
When transporting your configuration to a test system, you might be surprised to find that much of it is missing. Upon reviewing the documentation, you’ll discover that certain configuration tables need to be manually populated. This guide outlines the necessary steps and lists the tables that require manual addition.
Additionally, part of the configuration is stored in /ASADEV/ tables. These tables do not automatically record new or changed entries into transports because they need to remain editable in both Test and Production systems. Therefore, the content of these tables must be manually added to a workbench transport.
These steps can be executed using transaction codes SE09 or SE10. You must specify the “Program ID” as “R3TR” and the “Object Type” as “TABU.” The “Object Name” should correspond to the table you intend to add to the transport. To include all entries within the table, set the “Table Keys” parameter to “*” and utilize the “Function” button.
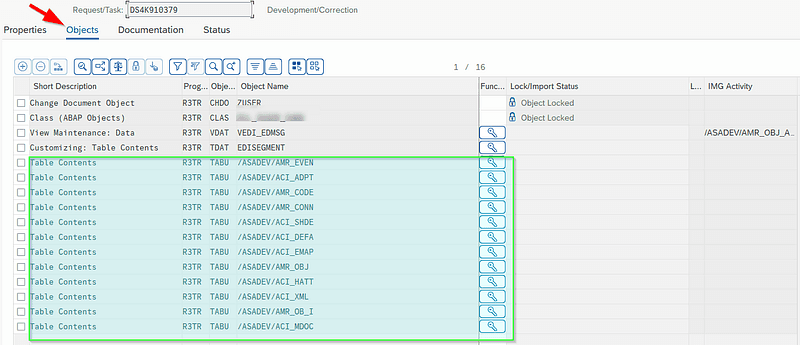
Tables to Add ManuallyThe following list of tables usually needs to be added manually to the workbench transport:
ASADEV/AMR_EVEN: Load Events (SAP EM)
ASADEV/ACI_ADPT: Cloud Adapter (SAP_EM)
ASADEV/AMR_CODE: Codepages
ASADEV/AMR_CONN: Cloud Instance
ASADEV/ACI_SHDE: Attributes per Cloud Instance
ASADEV/ACI_DEFA: Default values
ASADEV/ACI_EMAP: Handling of Return codes / Error messages
ASADEV/AMR_OBJ: Outbound Objects
ASADEV/ACI_HATT: Header Attributes of Replication Objects
ASADEV/ACI_XML: XML Mapping fields
ASADEV/AMR_OB_I: Inbound Objects
ASADEV/ACI_MDOC: Inbound Object field mapping
Steps for Transporting Configuration
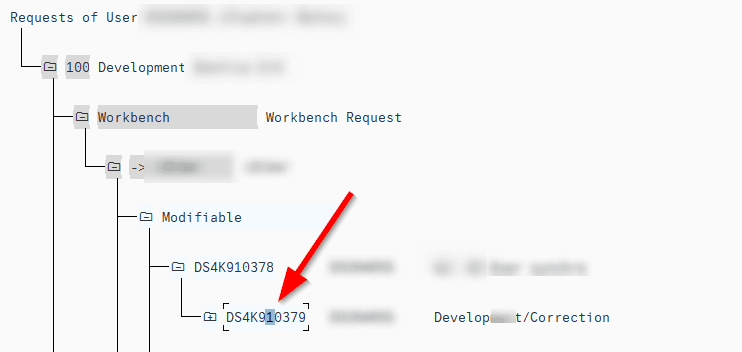
1. Identify the Workbench Transport:
Find your workbench transport and double-click on it.

2.Add Tables to Transport:
Go to the “Objects” tab, switch to edit mode, and add the required tables as new records.
Specify the “Program ID” as “R3TR” and the “Object Type” as “TABU.”
The “Object Name” should correspond to the table you intend to add to the transport.

3.Set Table Keys:
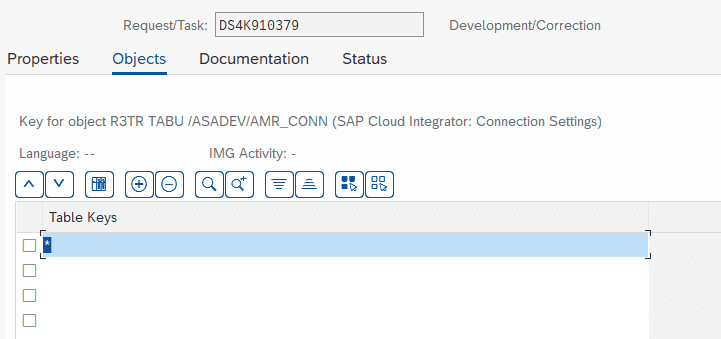
For each table record, you need to add the keys to transport the records.
Click on the key icon to access the Table Keys maintenance screen.
To include all entries within the table, set the “Table Keys” parameter to “*”. For specific records, enter the key values.

Here you can decide which records should be transported.
for all records — just put asterisk (*) there
for specific records — put key values there
Final Steps
After completing these steps, you should have everything necessary to transport your ASANWEE add-on configuration. Release and import your transport as usual, and then verify the results in the target system.
For more detailed instructions, refer to the SAP documentation.
It was also published here:
https://community.sap.com/t5/technology-blogs-by-members/transporting-configuration-in-sap-btp-event-mesh-add-on/ba-p/13738841
https://medium.com/@vbalko/transporting-configuration-in-sap-btp-event-mesh-add-on-fe44f60fbb4b
Technical blog
Transporting Configuration in SAP BTP Event Mesh Add-On

created by DALL-E

Vlado Balko
Jun 20, 2024
Integration
When transporting your configuration to a test system, you might be surprised to find that much of it is missing. Upon reviewing the documentation, you’ll discover that certain configuration tables need to be manually populated. This guide outlines the necessary steps and lists the tables that require manual addition.
Additionally, part of the configuration is stored in /ASADEV/ tables. These tables do not automatically record new or changed entries into transports because they need to remain editable in both Test and Production systems. Therefore, the content of these tables must be manually added to a workbench transport.
These steps can be executed using transaction codes SE09 or SE10. You must specify the “Program ID” as “R3TR” and the “Object Type” as “TABU.” The “Object Name” should correspond to the table you intend to add to the transport. To include all entries within the table, set the “Table Keys” parameter to “*” and utilize the “Function” button.
Tables to Add ManuallyThe following list of tables usually needs to be added manually to the workbench transport:
ASADEV/AMR_EVEN: Load Events (SAP EM)
ASADEV/ACI_ADPT: Cloud Adapter (SAP_EM)
ASADEV/AMR_CODE: Codepages
ASADEV/AMR_CONN: Cloud Instance
ASADEV/ACI_SHDE: Attributes per Cloud Instance
ASADEV/ACI_DEFA: Default values
ASADEV/ACI_EMAP: Handling of Return codes / Error messages
ASADEV/AMR_OBJ: Outbound Objects
ASADEV/ACI_HATT: Header Attributes of Replication Objects
ASADEV/ACI_XML: XML Mapping fields
ASADEV/AMR_OB_I: Inbound Objects
ASADEV/ACI_MDOC: Inbound Object field mapping
Steps for Transporting Configuration
1. Identify the Workbench Transport:
Find your workbench transport and double-click on it.

2.Add Tables to Transport:
Go to the “Objects” tab, switch to edit mode, and add the required tables as new records.
Specify the “Program ID” as “R3TR” and the “Object Type” as “TABU.”
The “Object Name” should correspond to the table you intend to add to the transport.

3.Set Table Keys:
For each table record, you need to add the keys to transport the records.
Click on the key icon to access the Table Keys maintenance screen.
To include all entries within the table, set the “Table Keys” parameter to “*”. For specific records, enter the key values.

Here you can decide which records should be transported.
for all records — just put asterisk (*) there
for specific records — put key values there
Final Steps
After completing these steps, you should have everything necessary to transport your ASANWEE add-on configuration. Release and import your transport as usual, and then verify the results in the target system.
For more detailed instructions, refer to the SAP documentation.


